
.png)


.jpg)


.jpg)


.jpg)


.JPG)


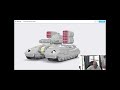
 The top photo is a taken from the rear of the Roman infantry. The second shows them advancing against the Sassanian light horse. The third is the advance of some of the Sassanian heavies. Picture no.4 is an action shot of Sassanian heavies going into combat as their light horse retires past them. The final one is a frontal close-up of the Roman infantry. The labels scattered around the table gave command and unit details, but in practice they were hardly needed. Round markers are casualty bases that we sat on top of numerical casualty chits - aesthetically more pleasing.
Minis look really good! The table isn't quite as beautiful as your home one, though.
ReplyDeleteHi Simon, unfortunately I can't claim the credit for the other table - it belongs to someone else in the club. The one we used at Edinburgh is a textured terrain mat; we have experimented in the past with a portable sand table, which is really nice but messy. Cheers for following the blog, by the way!
ReplyDelete