


.png)


.png)


.jpg)


.jpg)


.jpg)


.JPG)

Sunday 29 May 2011
Chalons
Just added a scenario for this to the Ancients Scenarios Page. Thanks are due to Simon MacDowall for permission to base it on his scenario for Comitatus here.
Bactrian Greeks against Eumenes
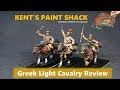
The current pretenders to the lands of Persia attack the rebel power that actually holds it. We used Bactrian Greek for the attackers, and the army of Eumenes for the defence. Deployment map:

The attackers have gone for what looks like a classic left hook. Their right wing (another Paul) comprises two units of 12 Light Cavalry with javelins, a unit of 12 Peltasts with javelins, a large unit of 3 elephant models (facing backwards) and 8 slingers out front. Their centre right (Billy) rests on the hill, and reads from left to right on the plans as you look at it: 32 Argyrapisdes-style elite phalangites; 32 phalangites; 48 Indian infantry; 32 phalangites and 48 Indian infantry. All are deployed in four ranks. 8 Skirmish javelinmen and 8 skirmish archesr are out to the frotn edge of their end Indians. Their left wing (Mark) comprises 12 Peltasts in front of 2 elephants; 16 Companion elite lancers; and at the extremity another unit of 2 elephants. In front of these is another 8 skirnish archers.
I went for a symmetrical deployment, which is pretty typical for me on the defensive. Our extreme left wing (Gordon) has 12 Light Cavalry in column beyond the far steep hill, which is occupied by 12 Peltasts. Inside those are 12 Companion elite lancers and a large unit of 3 elephants, hanging back. In front is a unit of 12 skirmish archers and another of 12 skirmish javelinmen. The centre (David) is basically a large phalanx formation. From left to right: 24 Argyraspides in three ranks; 48 Asiatic medium phalangites in four ranks; 32 Greek heavy phalangites in four ranks; 48 Asiatic medium phalangites in four ranks; and 24 elite heavy phalangites in three ranks. 12 skirmish slingers are at the front centre. I have a mirror image of Gordon's command. My army deployment was based on a wait and see attitude: see what the attackers' deployment looks like, and react accordingly. So it looks as though I will try to hold on the right while Gordon attacks on our left. The phalanx can pin the enemy centre.
In the event, ours was a crushing victory. Quote of the night came when Billy desperately needed a good result to shore up the line. Trying to calculate the odds, I put him off: "Just don't roll dice, Billy". I was right - he missed. Next up: Chandraguptra attacks the Bactrian Greeks, stabbing them in the back after their defeat here. A good strategist takes advantage! Should be good - Simon will at last be able to bring in his Indian army.

The defenders (in red at the foot of the map) have taken up position in a sort of long, shallow valley. There is a steep hill on either flank, and a central gentle rise. The attackers have one gentle rise in their centre as well. Simon chose the attacking army, which was deployed by Mark. I chose and deployed the defence.
The attackers have gone for what looks like a classic left hook. Their right wing (another Paul) comprises two units of 12 Light Cavalry with javelins, a unit of 12 Peltasts with javelins, a large unit of 3 elephant models (facing backwards) and 8 slingers out front. Their centre right (Billy) rests on the hill, and reads from left to right on the plans as you look at it: 32 Argyrapisdes-style elite phalangites; 32 phalangites; 48 Indian infantry; 32 phalangites and 48 Indian infantry. All are deployed in four ranks. 8 Skirmish javelinmen and 8 skirmish archesr are out to the frotn edge of their end Indians. Their left wing (Mark) comprises 12 Peltasts in front of 2 elephants; 16 Companion elite lancers; and at the extremity another unit of 2 elephants. In front of these is another 8 skirnish archers.
I went for a symmetrical deployment, which is pretty typical for me on the defensive. Our extreme left wing (Gordon) has 12 Light Cavalry in column beyond the far steep hill, which is occupied by 12 Peltasts. Inside those are 12 Companion elite lancers and a large unit of 3 elephants, hanging back. In front is a unit of 12 skirmish archers and another of 12 skirmish javelinmen. The centre (David) is basically a large phalanx formation. From left to right: 24 Argyraspides in three ranks; 48 Asiatic medium phalangites in four ranks; 32 Greek heavy phalangites in four ranks; 48 Asiatic medium phalangites in four ranks; and 24 elite heavy phalangites in three ranks. 12 skirmish slingers are at the front centre. I have a mirror image of Gordon's command. My army deployment was based on a wait and see attitude: see what the attackers' deployment looks like, and react accordingly. So it looks as though I will try to hold on the right while Gordon attacks on our left. The phalanx can pin the enemy centre.
 |
| Gordon advances on our left as the enemy light horse fans out into skirmish formation. Rather than face him head on, a confrontation they will lose, they are going to try to do as much damage as they can with their javelins. |
 |
| The imposing mass of enemy infantry in the centre. |
 |
| The enemy advances towards my wing, as expected. I am going to have to rely on the steep hill to break them up a bit. |
 |
| Gordon's troops are getting quite far forward. You can see that the enemy elephants at the end of their line have retreated as much as they can. They have now turned around and re-ordered themselves. This will presumably be their holding position as they anchor the enemy's oblique advance. |
 |
| However, the enemy infantry remains in place, so David angles out our phalanx units into his own oblique advance, leading with the Argyraspides on the left of the line. |
 |
| The situation on the right as my command awaits the opposition. The terrain is forcing them to commit piecemeal, which I am hoping will cancel out their advantage in weight here. |
 |
| Gordon's troops are closing on on the far end of the enemy line. |
 |
| The enemy infantry starts its own oblique move. the photo above shows the relative positions of the infantry centres at this point. |
 |
| Lack of space at my end forces the enemy elephants to press ahead of their Companions. |
 |
| The moment of truth arrives for my troops. The enemy elephants have chased my light horse right past the hill; at the same time, their peltasts contest the hill itself. |
 |
| I win, mainly because Mark's melee dice were terrible. |
 |
| An angled view of the remainder of the field at the same time. |
 |
| Contact. My elephants take advantage of the enemy's traffic jam to help out against the Indians. It will be only a temporary advantage, but every little helps. |
 |
| A rare sight: elephants versus elephant combat. Gordon's wing is making its main attack now. |
 |
| The action at my end as the enemy's elephants come charging in. By now, their unit that got around my hill has succumbed to a hail of missile fire. |
 |
| Gordon's moment of glory arrives. The enemy phalnax has had to advance due to their elephants losing, in case the rout spreads contagion. Gordon's Companions have been waiting for just this eventuality, and swing in to threaten the flank of the enemy's engaged Argyraspides. Pinned to their front, all they can do is await the blow. |
 |
| To add insult to injury, Gordon's light cavalry join in as well. The Argyraspides fight to the last. |
 |
| But it is a lost cause, as huge gaps appear in the rest of their infantry line. |
Wappinshaw June 4th
Wappinshaw is at the end of this week. I was really looking forward to it, especially in the new venue right in Glasgow city centre. And then work struck, so I won't be able to be there. All the best to everyone else, and if you go I hope you enjoy it.
Thursday 26 May 2011
Welcome
Welcoming Kingsleypark and Vinnie. Kingsleypark's blog has a whole range of gaming-related information. Vinnie has some lovely figures on display. I'm especially taken with his Tin Soldier Skythians, a make I had considered but never really seen before.
Cheers, both!
Cheers, both!
Sunday 22 May 2011
The Successors Wars Begin in Earnest
The Ptolemies have taken Syria from the long-independent Satrap, or at least his descendants, in our Empire campaign. This is something the Macedonians themselves never managed. It was a classic Successors battle, using Early Seleucid for the defenders and Ptolemaic Egyptian for the invaders. I don't have a deployment plan, but it was a case of large phalanxes in the centre plus loads of other stuff on the wings, for both armies. William organised and deployed the attackers, while I set up the Seleucids. Tha battlefield was somewhat constricted by a river running down our right flank, and some steep hills on our left. The latter played no real part in the game as we attacked anyway. Gordon ran our left, facing William; Michael took our centre across from Billy; and I had the Seleucid right, facing Simon.
And we'll see how long it stays that way! Next up: the Persian loyalists again attempt to take Persia itself back from the rebels. We'll use Bactrian Greek for the attackers, and Eumenes for the defence.
 |
| A view of the advancing armies, looking leftwards from my position at the right rear of the Seleucids. |
 |
| The right of the phalanx links with my wing via a large unit of elephants. Ptolemy didn't bring any of these with him. |
 |
| My force comprises (from the left): a unit of 12 Companions; 12 camel riders in column; and two units of 8 Skythian horse archers. The usual skirmishers are out front. |
 |
| A view to the left again, as the armies get closer. |
 |
| The phalanxes close. |
 |
| The enemy hangs back a bit on my wing, mirroring the situation on Gordon's flank on our far left. |
 |
| A quick look at the far left. |
 |
| Push of pike in the centre. Both sides have slight advantages at various points in the line. This is going to be close either way. |
 |
| I hold the elephants back a while. They are facing two units of phalangites, at least one of which is elite. Besides, I want to try to turn the enemy flank. |
 |
| The fight on Gordon's wing. |
 |
| My camels have a good time attacking the enemy's Companions, which means my unit of lancers can remain in reserve. In the meantime, my Skythians attack the enemy peltasts. |
 |
| Gordon has pressed the enemy well back on our left flank and Michael is making inroads on their phalanx. The two units you can see at the centre top of the photo above are destroyed Ptolemaic phalanxes. |
 |
| More of Michael's phalanxes press forward. |
 |
| And then disaster strikes the Seleucids: with the enemy on the verge of defeat, a morale cascade from one defeated phalanx disntegrates the Seleucid line. Ptolemy's army triumphs (barely) and Syria is now his. |
Saturday 21 May 2011
Beth's Stuka
Just to remind myself that I made one:
 This is a 1/48 Airfix model, done in Italian markings. I didn't quite get everything right, and it took me ages, but at least it's finished.

Sunday 15 May 2011
Carronade 2011: Qadesh or Khadesh
However you spell it, Qadesh was the game Simon put on at Carronade as a sort of Society of Ancients Battle Day game for Scotland. The game was played twice, and I ran the Hittites in the second game. Rather than try to model the whole running fight as well as the set pieces, Simon very sensibly depicted the swirling fight around the partially established Egyptian camp.
It wasn't a subtle plan, but it worked: a Hittite victory, to make up for the defeat earlier in the day. Thanks are due to Simon for supplying the whole lot, except for my old mat.
 |
| Above: angled view of some rather nice Hittite chariots |
 |
| Some of their Egyptian opponents |
 |
| A posed shot of how they look in combat |
 |
| Mark wanted a comparison shot to show the different axles. The Hittie chariot on the left has its axle centred under the car, while the Egyptian on the right has the axle at the rear of the car. I think there is something of an ongoing debate about this: the rearmost position suits the lighter chariots, while the heavier ones need the extra support in the centre. This is because all of the weight would otherwise be on the horses. |
 |
| The Hittites are about to attack the camp from two directions. The shot above is taken from behind my side of the table. I have all the lighter chariots, while the King himself leads the heavies in from the other side. We both have some light infantry in support. The Egyptians (including Ramesses) are massed in and around the camp, with some chariot forces on both flanks, back to back. The rightmost Egyptian chariot unit as you look at the photo is commanded by the Egyptian Prince. |
 |
| A shot of the Egyptian defenders facing my front left. |
 |
| The defenders to my front right. |
 |
| And the centre. One unit of chariots and some light infantry are lurking outside the temporary defences, with some archers in reserve. |
 |
| My plan is not subtle... |
 |
| ...as you can see. |
 |
| I do hang back a bit on my right. I don't want to commit here until I see what the Egyptian Prince does. |
 |
| I simply attack with the massed chariots in column. |
 |
| On the other side, The Hittie King (Stuart) has reached the camp's ramparts with his heavier chariots. |
 |
| My chariots have crushed the light infantry in front of them, but are stopped by the ramparts. This provides the enemy light archers with a rather lovely large target. |
 |
I promptly retire these units, just as their compatriots to the left of this photo above break through in their turn. The reason for retiring on my right here is to do with the way morale works in the rules. I need to keep the momentum going but if I lose a unit or two to shooting, there could be a cascade morale effect on my leftmost units. This would stall the advance into the camp itself. So I retire my two right units, both of which are feeling the attrition. The Hittite King, meanwhile, fails to see the tactical sense behind my decision and shouts across the field that if I don't keep fighting, he'll slaughter all of my relatives. He is obviously deeply unfit to rule, since my sensible precaution will obviously win the battle for us without the loss of expensive chariot units. Ramesses isn't the only one who can rewite history! |
 |
| Meanwhile, at the far left, Pharaoh has helped his chariots to destroy some of ours. |
 |
| However, at the same time to my right, my light chariots meet Stuart's heavies in a victory dance over the crushed remains of the Egyptian prince. |
 |
| And in the camp itself, some Egyptian archers meet the same fate, caught between my light chariots and the Hittite King. |
 |
| Just to finish off: a small vignette of Egyptians leading some captives. |
Subscribe to:
Posts (Atom)